Rockin’ out!

It’s time for another musical cake of sorts. Keeping in tune with the theme of birthdays, I had the opportunity to make an electric guitar cake for another coworker’s daughter’s birthday. She’s into the band “Pierce the Veil,” and the request was a personalized electric guitar cake. Here we go!

IMG_1480

The baking process here began with planning- I had to figure out how big the final cake was going to be before even turning on the oven. The cake had to feed roughly 10 people. I decided to sketch out a guitar body that would fit over a 9×13″ cake, and scale the neck of the guitar and accessories accordingly. I had to make it proportional or else it would completely lose the effect.
IMG_1481To customize the guitar with the “Pierce the Veil” logo, I printed out the sketch that my coworker Dave sent to me. His daughter actually drew it, and we wanted to incorporate it to make it special. This helped me to get an idea of the scaling for the decorations.

IMG_1483

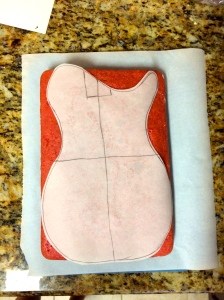
After finalizing the sketch, I copied the guitar body onto parchment paper and used it as a template to carve the cake.

IMG_1484

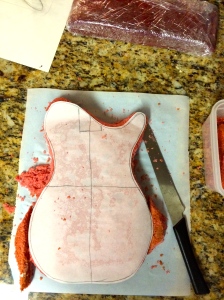
I used a serrated knife to get a clean cut around the edge.

IMG_1492

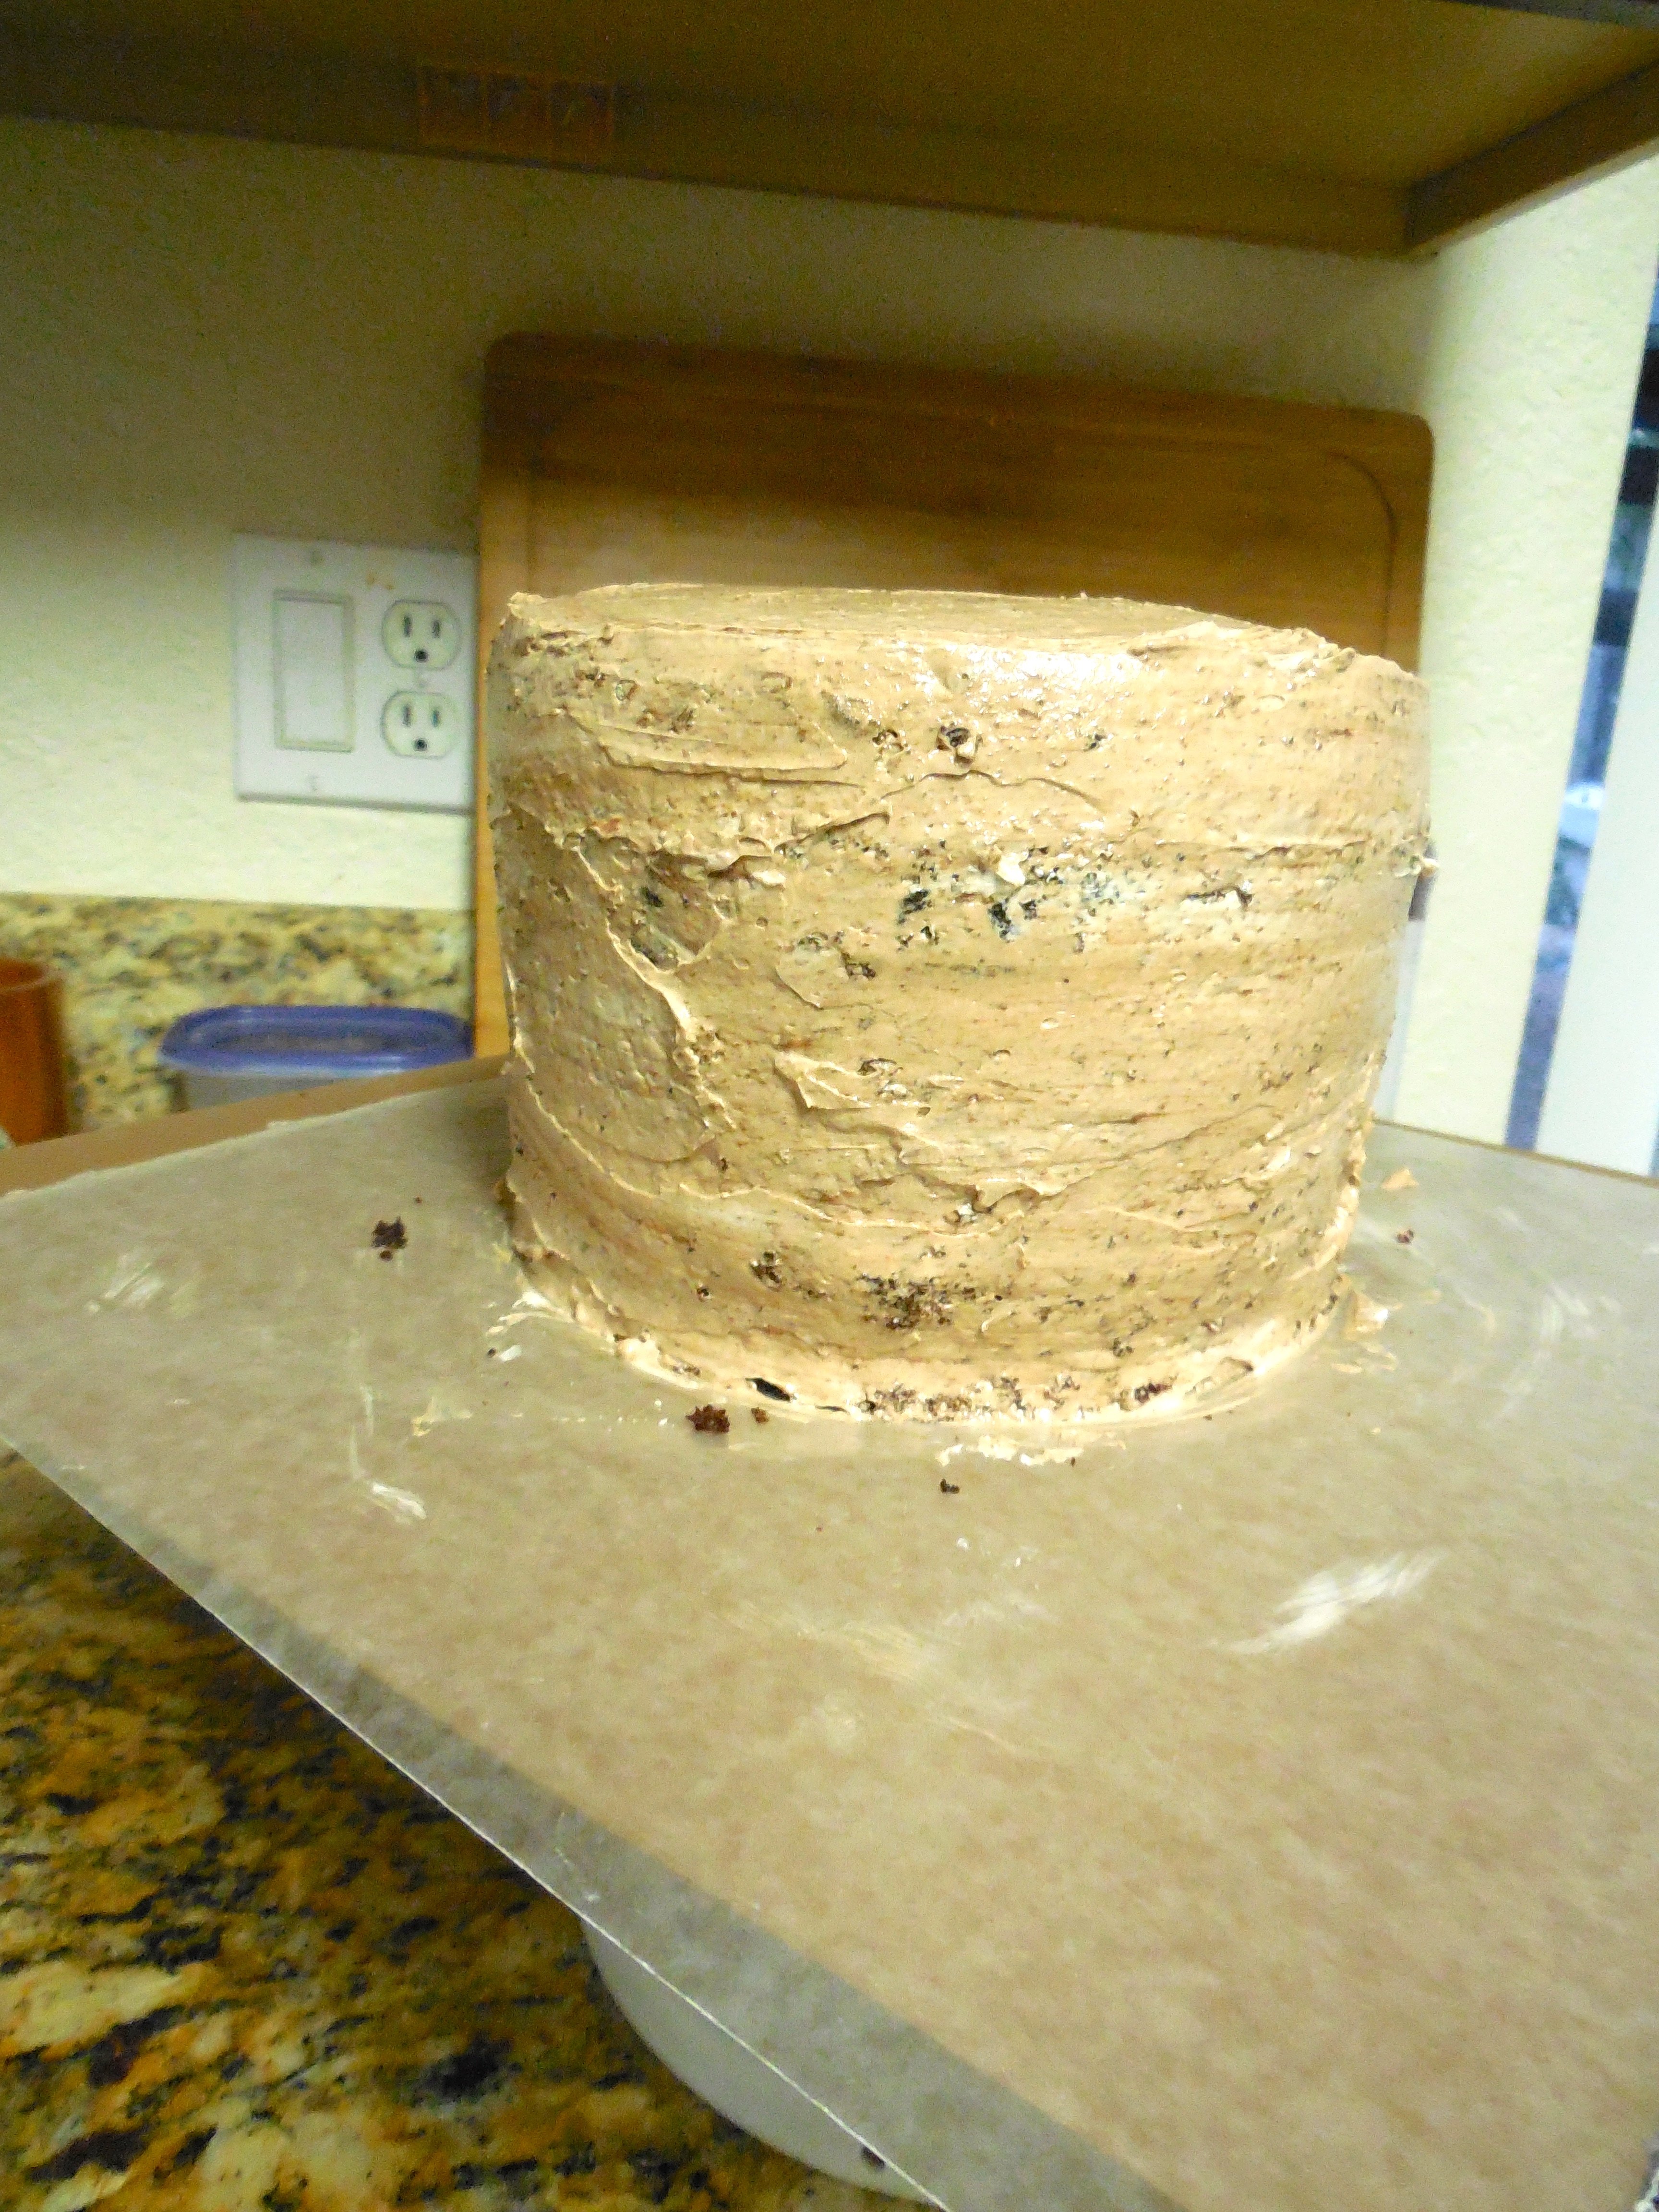
The cake was strawberry flavored with a vanilla buttercream. Strawberry cake is interesting (in my opinion)- I’ll have another post on that coming up with recipes & ingredients for the cake part. Here is the cake, post crumb coat and final coat of buttercream.
IMG_1493

I covered the cake with Fondariffic black fondant. I really liked how smooth it is, and for shapes like this, it smoothed over really nicely. If it was a more 3-D shape, I might not opt to use this brand as it never really seems to stay really gooey.

IMG_1495

While the body of the guitar was setting up, I started working on the guitar neck. To keep the right proportion, I needed a thin material for the neck. I chose to use wafer cookies- they are thin, light, and structurally sound enough to support the weight of fondant. Using my template, I pieced together and carved out the shape of the neck from a single layer of wafer cookies.

IMG_1517

This mid-process photo shows the neck after being covered by black fondant, assembled into the body, and the silver details beginning to be added. The silver details are just rolled out and cut fondant painted with edible silver dust.
IMG_1521

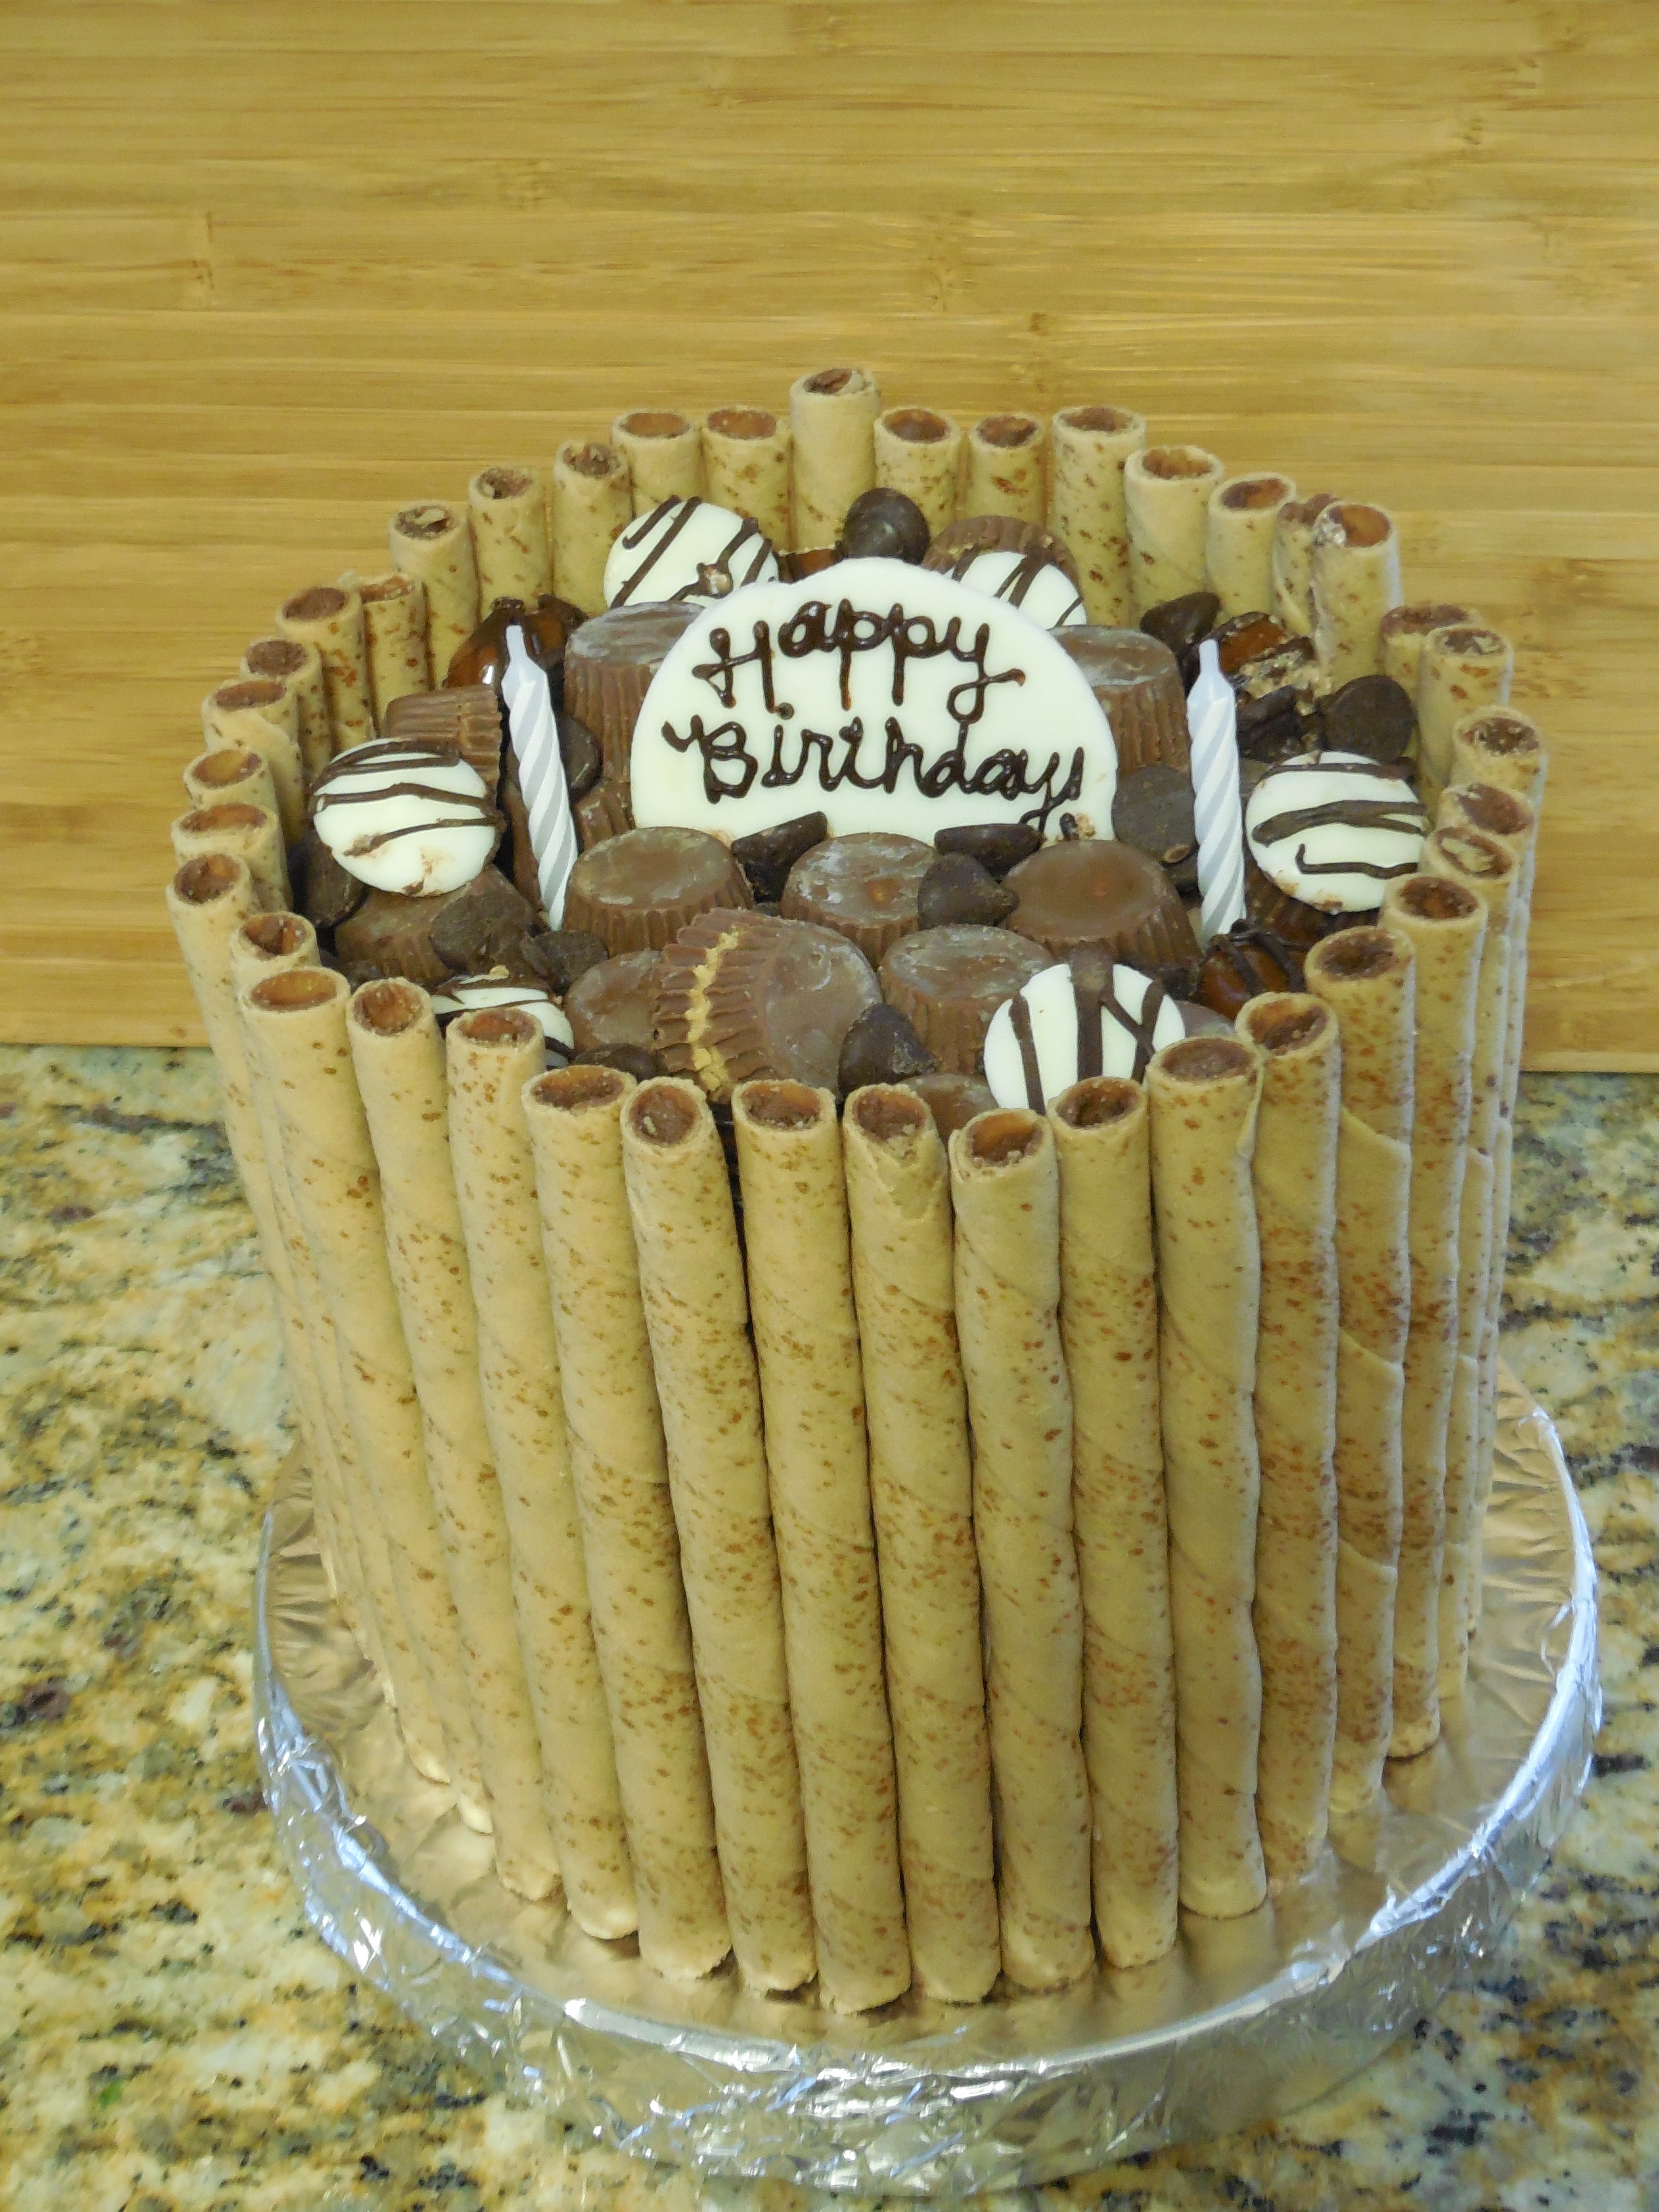
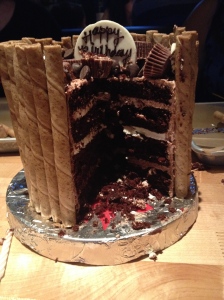
The final product, including the “Pierce the Veil” logo that I had help on from my in-house creative director (the man). The only non-edible part on this cake is the guitar string assembly.

IMG_1522A top view.

IMG_1529

I supported the neck with some aluminum foil covered foam core blocks. Overall, I was really pleased at the proportion of the cake! I think Dave and his family were happy as well. 🙂

Supernatural(ly) Red

I got another birthday cake request from a coworker and was eager to take on the challenge! The cake proposition was a black ’67 Chevy Impala from the show Supernatural, for a 16th birthday. The cake flavor of choice- Red Velvet. Since I’m not a huge Red Velvet fan, I don’t typically bake it that often, so I had to do a little research and practice.

IMG_1437

Here is my “test cake.” It’s delightfully RED. I found that using Americolor Gel Color usually gives a great pigment without changing the liquid content of a cake or frosting too much. I was looking for a dense but moist Red Velvet to hold up to all the carving that I knew would have to happen before applying fondant.

IMG_1439

My test cake, frosted with a White Chocolate Cream Cheese Frosting. This was a new recipe as well- but I loved it. The white chocolate firms up better than just the normal cream cheese/butter mix and also adds a subtle tang. I ended up using this recipe for the filling of the cake.

IMG_1441

The recipes are from a book called, “Rose’s Heavenly Cakes.” Check it out! There are recipe excerpts on Amazon. I adapted the White Chocolate Cream Cheese Frosting slightly, mostly just switching up the technique. (I only have a mini-food processor, so I ended up just using my stand mixer to whip everything together.) I also doubled the recipe to get enough to fill the car cake. Here’s my edited version:

White Chocolate Cream Cheese Frosting Ingredients (Makes : almost 1 cup)

  • White chocolate containing cocoa butter (3 ounces)
  • Cream cheese, softened but still cool (4 ounces)
  • Unsalted butter, softened but still cool (2 tablespoons)
  • Sour cream (1/2 tablespoon)
  • Almond extract (1/8 teaspoon)

Melt the White Chocolate
Heat the chocolate until almost completely melted. Use a small microwavable bowl, stirring with a silicone spatula every 15 seconds.

Make the Frosting
In a stand mixer, whip together the cream cheese, butter, and sour for a few seconds until smooth and creamy. Scrape down the sides. Add the cooled melted white chocolate and whip until it is smoothly incorporated. Add the almond extract and whip together.
IMG_1479

I wanted to make a realistic replica of the car, so I researched and printed off some photos (all angles) of the Chevy Impala. Knowing that the car was to feed a minimum of 10 and was for more of a family event, I didn’t want to make it too big. I decided to bake 2- 9×13 pans, cut them along the long edge (hot dog style), and stack them side by side to get the approximate proportion that I was looking for. I then sketched up a side view of the car to use as a template for carving.
IMG_1485

This is a top view of 3 of the cake layers “stacked” horizontally. Each layer is 4.5″x13″. I had 4 layers, but that made the car too wide.

IMG_1486

I traced my side view template onto parchment paper (so that it is slightly transparent), and lined it up with the stacked cake.

IMG_1488

I didn’t get any photos of the carved cake (pre-buttercream), but I basically followed the template, referencing the other photos as I went to get the shape close. Then I crumb coated it with a Swiss Meringue Buttercream (my favorite for building cakes, it’s so smooth).

IMG_1489

A front view of the cake. I tried to match the “V” shape of the grill.

IMG_1490

Another side view.

IMG_1494

I wanted to make the windshield look like it was “embedded” into the car body, so I cut out approximate shapes of the windshield out of grey fondant and placed them where they would be on the car.

IMG_1496

Then, I covered the entire car in black fondant. I used Wilton’s Black Fondant, and I found that it was stiff enough to work with but had a tendency to dry out a little if you didn’t work fast enough. This produced some cracks, especially in oddly shaped areas (like the wheel wells).

IMG_1498

To get the windshield effect, I lightly cut through the top layer of fondant (the black) and revealed the grey fondant. I then peeled back the shape.

IMG_1502

And then did a bunch of detail work of which I didn’t stop to take photos. (Typical)

IMG_1504

With the windshield embedded, I was able to roll out thin ropes of fondant and “line” the edge of the windows where the grey met the black fondant. I painted these with edible silver luster (a new favorite decorating material of mine).

IMG_1505

The grill, bumper, side mirrors, and lights were made in a similar fashion- I shaped the parts out of grey or black fondant and painted them silver. The slight variation in color just depends on what the base fondant color was.

IMG_1506

The wheels were made by my in-house modeling chocolatier. Ok, I made the modeling chocolate (also a new technique that I learned and implemented in this project). I’d been wanting to try it but hadn’t gotten around to it. Now that I know how easy it is, I will incorporate it more in future projects! The hubcaps are grey fondant painted silver. Basically, we employed a series of round cookie cutters and a lot of shaping by hand.

IMG_1512

I used the same thin ropes of fondant for the border of the tail lights. The tail lights were just grey and red fondant squares.

IMG_1509

I built a foam core base and covered it in aluminum foil to help support the base of the car.

IMG_1516

Lastly, I used some modeling chocolate to incorporate Gabby’s love for music (in a music note). She’s into band right now, and it was one way I could think of to incorporate that theme subtly without adding anything to the car.

IMG_1518

Happy Birthday, Gabby!

Everyday I’m Truff-a-lin’

Cake truffles. I’ve stayed away from these for a little while just because anything bite-sized is pretty labor intensive. Props to those who have the patience to put these together! I decided to try them to bring to a baby shower since they were individual servings and easy to transport. There aren’t too many photos of the process- my hands were usually covered in cake or chocolate ganache, but I was happy with the result.

IMG_0673

There were two flavors: Chocolate-Peanut Butter Truffles (inspired by mini Reese’s cups) and a Raspberry White Chocolate Truffle (Raspberry is always a favorite of mine). I topped the Chocolate PB ones with cut up pieces of the mini Reese’s cups, and the Raspberry ones with sprinkles.

IMG_0674

Here’s a general recipe that I used. I improvised a little, knowing the basic theory behind cake truffles. Instead of using frosting as the binder, I used ganache for the PB ones and a Raspberry Jam for the Raspberry ones. I used ganache for the coating instead of white chocolate or dark chocolate, which would have hardened a little more into a candy shell. I think some of my tweaks were made mostly out of laziness, but it tasted pretty good when all was said and done :).

Chocolate Peanut Butter Cake Truffles (Makes 12-15)

  • 2-3 cups White or Yellow Cake, already baked
  • 3 oz semi-sweet chocolate (chips or bar)
  • 1/3 c. heavy cream
  • 1-2 TBSP Peanut butter
  • Mini Reeses cups (for topping)

Directions:

Microwave the heavy cream for 30-45 seconds until hot. Add semi-sweet chocolate chips. Let this sit for a minute or two while the cream melts the chocolate chips. Whisk together until smooth. Whisk in the peanut butter a little at a time, making sure the ganache doesn’t seize.

Crumble up the cake into fine crumbs. Pour a little of the ganache into the mixture until the cake crumbs come together and can form a ball. You don’t want this to become too mushy, so work a little ganache in at a time. Reserve at least half of the ganache for coating the truffles.

Form 12-15 cake balls. Put in the freezer to cool down. In the meantime, cool the ganache in the fridge. The consistency should be runny enough to cover a cake ball and coat it evenly.

Coat the balls and place on parchment or wax paper (something non-stick). I used two forks and the “dunk” method- I placed a cake ball in the middle of the ganache bowl, rolled it around, and lifted it with a fork, sliding it onto a cookie sheet. When done, place these back in the fridge or freezer to harden.

I used mini cupcake liners for each cake truffle when I was done.

Raspberry Cake Truffles (Makes 12-15)

  • 2-3 cups White or Yellow Cake, already baked
  • 3 oz white chocolate (chips or bar)
  • 1/3 c. heavy cream
  • 1/4 c. Seedless Raspberry Jam
  • Sprinkles (for topping)

Follow the same directions as above, but instead of using the ganache inside the cake truffle, use the Raspberry Jam as needed to get the right consistency.

I might add that since I used ganache, it was more of a soft, slightly sticky chocolate coating. It never really solidified into a hard candy shell. If you prefer that for easy of transport, then I would use candy melts or just white or dark chocolate for these. I was experimenting and thought the ganache worked fine, but it’s totally up to personal preference. 🙂

Peace, Love, and Cake

I was super excited for this cake project- one of my coworkers found out that I bake as a hobby and asked if I could make a VW van cake for her daughter’s 15th birthday. I immediately had lots of ideas in my head on how to make this a fun, brightly colored cake to fit the theme of fun hippie youth.
IMG_0604

A lot of times the inside of the cake is forgotten in the whole process of cake-istry. I thought this project posed a great opportunity to make the inside of the cake just as fun with the addition of some food coloring. I baked two 9×13 layer cakes with various colored white cake batters with the intention of a fun surprise when the cake was cut open.

IMG_0605

I love the way the colors look like tie-dye!

IMG_0606

Here are the two cakes after evening out the top for stacking.


IMG_0607

To get the right shape for the VW Van body, I cut the 9×13 layers in half (like a hamburger, not a hot dog, you know what I mean) and stacked them for a total of 4 layers. I was given creative license with this cake so decided to put a raspberry buttercream in between the layers for a pop of flavor.

IMG_0608

In the meantime, I made a platform for the van out of foam core, knowing that there needed to be clearance for the wheels. One lesson I learned in this project is that the supports are just as important as the cake.

IMG_0610

Back to carving the iconic shape of the VW Van. I rounded the front and trimmed up the sides to make them a little more symmetrical.

IMG_0614

Here is the swiss meringue buttercream coating that holds it all together. At this point I carved the wheel wells also.

IMG_0616

I covered the top half of the van with white fondant, and created the iconic “V” shape in the front.


IMG_0618

Following along with the tie-dye theme, I rolled together a few different colors of fondant, which created the tie-dye effect. At this point, I started getting more focused on the details and forgot to take pictures of the rest of the process. I’ll try to talk through the things done on the finished photos below.


IMG_0628

I was asked to do a little cartoon version of the birthday girl driving the van so I used some fondant and a toothpick for stability to create her!

IMG_0629

Ok, So after adding the tie-dye panels, I tucked the fondant wheels into the pre-made wheel wells. The next steps were a white front bumper, a white “rooftop” and roof rack, and grey windows.
IMG_0631

The small details fell into place- the yellow lights and pink “HPY BDY” license plate. I had my in house fondant sculptor help me with the VW logo 🙂

IMG_0632

Here is another side view. I used some purple fondant to make the lining of the tie-dye panels.

IMG_0633

The roof is covered with tie-dye fondant cut outs of hearts and flowers and peace signs.

IMG_0644

The back has a white bumper, two red lights, and of course a customized “Taylor” license plate for the birthday girl.

IMG_0653

Another side view of the van riding into the sunset (or my dining room lights). 🙂

Happy Birthday Taylor!

Sugar Rush!

Continuing our journey through what I like to call “Birthday Season,” we have Meg’s birthday! Every year is a challenge to come up with something different and fun, and I’m pleased with the result of this year’s cake. Lauren and I decided to play on her love of candy and sprinkles and all things sugary.

IMG_0192

We started with a base of homemade funfetti- basically a white cake with tons of sprinkles tossed in.

IMG_0215A 6 in. tier with two layers, ready for vanilla buttercream filling.

IMG_0239

Sprinkles and Meg’s favorite jellybean- the Starburst jellybeans.

IMG_0240

We might have overdone the sprinkles- but as Meg would say, “There is no such thing as too many sprinkles.”

IMG_0246

Yup, we did- or actually, Lauren did- we took the frosted 6 in. tier and rolled it in sprinkles!

IMG_0193

This vision came together piece by piece. We had an idea for the two tiers, but wanted something fun for the top. I had been wanting to experiment with decorated slabs of chocolate, and thought this was the perfect topper for this project. Above is a photo of melted white chocolate with some food coloring mixed in, topped with pink and red heart sprinkles and pink edible glitter.
IMG_0196Once the chocolate dried, I used cookie cutters to cut a heart and circle out of the chocolate.

IMG_0248

Another experiment: pink and yellow tinted white chocolate mixed together, topped with nerds, sprinkles, and edible silver dragees. A note for anyone who tries this- I believe I spread this mixture on a silicone mat so that it didn’t stick. Parchment paper also works well. 

IMG_0254

The resulting white chocolate cut outs were pretty! Some were a little fragile but the good thing about chocolate is that you can glue it back together with a little more melted chocolate 🙂 You’re probably wondering how we attached these to the cake top.

IMG_0252

We made them into lollipops! (of sorts) I’ll add that Lauren turned into a candy-maker and made some actual lollipops using a similar technique to the white chocolate, but melted jolly ranchers instead and threw in all the fun toppings.

IMG_0262

The finished cake- a toothache waiting to happen! The smaller tier was a 4 inch funfetti cake, filled with vanilla buttercream, and covered in careful arranged Starburst jellybeans. Lauren did the legwork there.

IMG_0263

We managed to arrange all of the lollipops on top in varying heights for some visual interest. I piped a small border of buttercream dots between the layers and at the bottom of the 6 inch tier.

IMG_0276

It was a small cake, but sometimes I think “personal” size is more fun. If you look closely, you can see the candles, but it’s hard to tell with all of those colors! It was probably the sweetest cake I’ve ever made- no pun intended- it smelled like sugar! Happy Birthday Meg!!

In a Nut(ella)Shell, Happy Birthday!

And we are back to Birthdays! I wanted to squeeze in one more post before hitting the hay. (Retroactive chain-blogging, it’s all the rage, you should really try it.) It was that time for the annual celebration of Bri Joy, and I was itching to make a cake that didn’t really resemble anything, but focus more on the ingredients. Bri loves Nutella- inspiration hit, and off I went!

 DSCN0906

The lineup: Caramel-coffee Nips candy, Chocolate biscuits, Pirouette cookies, and the star of it all: a brand spanking new jar of Nutella.

DSCN0908

What do we have here? Yup, mixing Nutella into some Swiss Meringue Buttercream. (It really is my favorite buttercream to both eat and work with). It holds up well once refrigerated and tastes light but rich.

DSCN0909

Folding Nutella into the buttercream!

DSCN0912

Stacking the cake- I chose to make my go-to chocolate cake recipe that is both moist and holds up well without being too dense. I wanted a taller skinnier cake, so went with 4 layers in 6″ rounds. (This picture only shows the first 3.

DSCN0914

Covered in a nice layer of Nutella buttercream.

DSCN0917

Here’s where we get into the goodies- I lined the perimeter with Pirouette cookies, creating a “fence.”

DSCN0919

What shall we do with these Reese’s cups?! So many to unwrap!

DSCN0922

I filled the “cup” with all sorts of candies- Reese’s, Nips, and some white chocolate drops. I also think I snuck some chocolate covered biscuits in there.

DSCN0923

The “Happy Birthday” is just melted chocolate piped onto a small slab of white chocolate.

IMG_4324

We went out for Bri’s birthday dinner to a local burger joint. I was able to package the cake up sneakily and bring it in. Luckily they were really cool about helping us serve an outside cake in the restaurant! The servers even bargained for a slice. They also kept asking me if I got the idea on Pinterest. Um… not really? It’s not the most original idea but I’m pretty sure I didn’t see it on Pinterest.

IMG_4323

A slice! It looked better in the restaurant 😉

Happy Birthday Bri!

Fe/Male?

I think it’s time for a cupcake post! What’s more fun than revealing a secret using baked goods?! Ok, maybe a few things come to mind, but I was pretty pumped for this project.

Our friends Nancy & Brian were expecting (yes, the little one has arrived at this moment in time), and wanted to throw a gender reveal party after they found out the sex of their baby. The idea was to make male and female cupcakes and have guests choose what they think the baby is. Then the answer would be revealed later.

Nancy, being in the medical industry, decided on the universal symbols for male and female. I used this opportunity to hold a fondant making lesson as well.

IMG_4261

The plan was to make chocolate cupcakes for boys and strawberry shortcake cupcakes for girls.

IMG_4266

Here are the “female” cupcakes- stuffed with chopped fresh strawberries and a dab of swiss meringue buttercream, piped with buttercream and topped with a pink fondant “female.”

IMG_4267

Here are the chocolate cupcakes frosted with a chocolate buttercream (think cocoa powder, butter, powdered sugar, splash of milk), and topped with the blue fondant “male” topper. IMG_4270Lots of cupcakes and a mac! 🙂

The secret is out- it’s a BOY!

Congrats, Nancy & Brian!

Gone Campin’

The best part about being so behind on these posts is going through projects of the past and reminiscing on the celebratory (or just because) event for which the baking was done. In this case, a Birthday! Lauren’s birthday, to be exact.

Since she is such an outdoorsy & adventurous person, Meg and I thought it would be fun to do a camping theme! I didn’t take too many process photos this time, but I thought the end result was fun (and tasty).

Gone Campin'

Here is the cake- it’s a two layer vanilla cake with swiss meringue buttercream filling. I think we just cut a 9″x13″ cake in half and stacked it. The trees were sugar cones covered in green frosting (piped with the leaf tip). The tree trunk was a pretzel rod, and the whole thing held together surprisingly well. We had to have a creek lined with Raisinet stones, a chocolate graham cracker tent, and a fire pit made of pretzel pieces and more Raisinets. The logs were Twix bars, cut short.

A little Cabin

We can’t forget about the Swedish fish- what’s camping without some wildlife? 🙂

Happy Birthday Lauren!

Sugar cookies, baseball, and summer holidays

Summertime in the Phoenician desert means everything melts. In this sense, cake making takes a summer holiday and I end up baking other sweets that aren’t as sensitive to the heat (sorry, buttercream-dressed-cakes; see ya later, modeling chocolate decorations, ’til October, fluffy ganache fillings). Sugar cookies are a great alternative- they don’t take that long to bake (hence I’m not running my oven for hours), they hold up well in the heat, and the royal icing actually dries faster in the dry, hot summer air.

Along with the summer lull in caking, I notice a simultaneous lull in sports, thanks to my resident sports expert. Baseball is the only one of the “four major sports” that runs through the summer.

So, why not mix the two in a baking project?

I have a sizable group of friends who pledge sports loyalty to Detroit and their teams, having moved from Michigan. One of them, Melissa, was having a birthday and I wanted to give her something, so I had Matt help me make some Detroit Tigers jersey cookies:

IMG_3673

Miguel Cabrera, anyone?

IMG_3675The Tiger’s “D” & my man Chet Lemon.

IMG_3676

I had to make my other non-sports cookies, of course. My sister gave me 101 cookie cutters, so I had to put them to good use. An airplane, a fish, a mason jar with a flower, a doughnut, and some dinos 🙂

IMG_3682

I had to make a nerdy dino, of course. When the opportunity presents itself…

IMG_3686Individually wrapped in cellophane baggies- always a nice touch and convenient for transport!

IMG_3696I might add that I use the sugar cookie recipe from Sweet Sugar Belle and also learned from her royal icing tips. She’s an expert at this stuff and a sugar cookie genius! I love it, definitely stop by and check out her site.

Happy Easter! And Go Redwings!

Ashamedly, this blog has fallen to the wayside for about a year- I found this draft from Easter 2014, and it’s almost Easter again! Naturally, life has been crazy- but better late than never! I’m determined to back-blog all of the baking projects from the past 10 months or so. My apologies if they aren’t all chronological- for the most part it won’t matter unless they are holiday related 🙂

Let’s pick up where I left off… We had a picnic on Easter to hang out and enjoy the day, and I wanted to bring some dessert. Cookies seemed like the most robust option to hold up on a hot day, so sugar cookies and macarons it was!

DSCN0308

Getting some sugar cookie dough rolled out and shaped!

DSCN0310
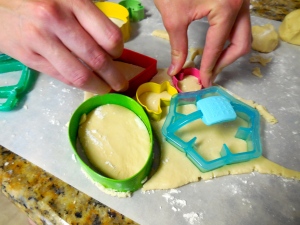
A lovely volunteer hand model…
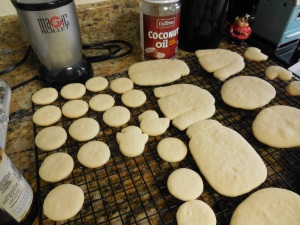
DSCN0311

All baked and ready for the royal (icing) treatment!

20140601-122447.jpg

An assortment of Easter themed decorated cookies…

IMG_3094

I was having a little fun with my new mason jar cookie cutter 🙂

I might add that this was around the Stanley Cup playoffs. Naturally my resident Red Wings fan had to make a few hockey-related cookies:

IMG_3096

A Red Wings hockey jersey!

IMG_3093

And… this is me getting a “sports education…” The ugly sweater is a lucky sweater belonging to Georgetown’s basketball coach. That’s basically all I picked up. Either way, I liked it for the cool retro vibe and colors ;).

On to macarons!

This was my first time making macaron shells- it was reasonably successful. I made plain shells with Nutella buttercream frosting for the filling. I used the recipe for the shells from Bravetart, as I have been avidly reading baking blogs and stumbled across hers.

20140601-122513.jpg

I found that parchment paper worked best for my needs (I had tried using a silicon mat with the little indented circles, those did not work at all for me). Also, I probably should invest in better cookie sheets.    IMG_3091

The tiny sandwich cookies make me so happy, and I have no idea why.

IMG_3672

I was proud at how they turned out for my first time- but I caught the “perfecting macaron” fever! More to come on that.

IMG_3095Happy Easter 🙂